mickeyobe
Lifetime Member
 Resident President
Posts: 7,280
|
Post by mickeyobe on Nov 30, 2012 20:55:15 GMT -5
Thank you, Stephen.
At last I may be able to replace missing and cracked ground glass in some of my old cameras.
I once had some made for me by a company that sold stained glass supplies.
They sand blasted the glass but it was much too coarse to be of any use.
Mickey
|
|
Stephen
Lifetime Member
Still collecting.......
Posts: 2,718
|
Post by Stephen on Dec 1, 2012 10:40:58 GMT -5
Actually the tapes plane as shown will be forward of the film plane, by the difference in depth of the film aperture surround and the film rails, which are on the film focus plane. This may vary with makes but can be about 20thou out of the focal plane, enough to miss focus at infinity, especially with large aperture standard lenses.
You can still use tape, but stretched across the rails top, which is the film plane. Scotch matt repair tape, (so called "invisible tape") works well.
However after saying this in practice film does not lay flat anyway!, it curls cross the frame in both directions, which is why the pressure plate does not usually press the film on to the rails, only gently pressing it home, to make it easier to wind on.
The one shown, a Fed 2 does press the film to the rails, but the pressure springs are weaker and still allow wind on.
Most Japanese designs, and modern film cameras do not press hard, there are double rails, the outer take the pressure from the plate, the inner take the film, which runs loosely through the minute gap.
|
|
Stephen
Lifetime Member
Still collecting.......
Posts: 2,718
|
Post by Stephen on Dec 1, 2012 11:04:59 GMT -5
On the depth micrometer, a vernier caliper with do fine,(they are quite cheap), the measurement is dead 28.80 easy to set a vernier to, and they are all made with a spur extension to do depth measurement. 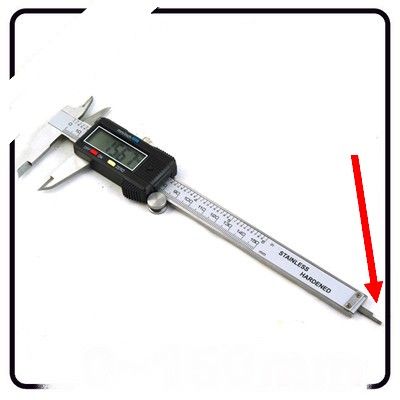 The spur for depth is shown by arrow, this one is digital and under £7 on Ebay. But at a pinch you can get a piece of flat hard wood and bang a nail in to it to extend out the 28.80, measured on a good steel rule, knock it in a fraction farther than 28.80 and then file the tip to the exact length. Put a flat surface, it does not have to be glass, on the rails that the film rests on normally, and drop in the nail from the front, the wood should just touch the mount front, if it wobbles on the nail, the distance is too short, and if the nail does not touch the film plane, the distance is too long. Not as scientific as a vernier calliper, or a depth micrometer, but it does check the camera out. The 28.80mm applies, of course, strictly to Leica only, or clones of Leica, there are tables of film to flanges distances in Wikipedia for other SLRs and rangefinders with interchangeable lenses. Frankly, the main ones that do need checking are Russian!! or very old Leicas that have been got at by age, been sat upon, dropped, or had bad repairs done to them. However it is very rare to find a Kiev "Clone of Contax" out of true, the design is better in having the focus mechanism in the body, to get it to work at all, requires careful setting at the assembly point in the factory. Kiev seemed to get it right most of the time. Stephen |
|
Berndt
Lifetime Member
Posts: 751
|
Post by Berndt on Dec 3, 2012 4:40:41 GMT -5
You're right. Thanks for pointing that out !!!
About those 28.80 mm ... I thought about it again and actually, wouldn't that be the least expected error ? On the one side, we do have the lens, which might be mis-calibrated ... and on the camera side, we do have the rangefinder. I never opened a FED yet, but I noticed some kind of lever close the camera mount, which seems to be connected to the rangefinder. That's obviously the way, the rangefinder get's the distance information from the lens ... and it is just calibrated by a simple screw ? ... as far as I could see. There might be more if opening the top plate, what I haven't done yet though.
|
|
Stephen
Lifetime Member
Still collecting.......
Posts: 2,718
|
Post by Stephen on Dec 3, 2012 15:18:07 GMT -5
The Russian poorer assembly and the soft bodies of the early ones always left the 28.80 suspect, it is likely to be all right on the later Feds and Zorkis, but is worth a quick check, there is no sense in arranging the rangefinder to work with a lens that is not able to accurately focus to infinity.
The basis of Leica and clones focusing systm is a collar on the back of the lens which sticks out a certain amount at infinity, and is altered as the focus operates, with the tip of the rangefinder arm following the collar.
Therefore this distance at infinity for the collar needs to be known, and I do not know what it is!! In repair shops I compared it to known working Leica lenses.
But I think in the main the collar is likely to be correct on most lenses, and the adjustment should be confined to the rangefinder mechanism. Most have a screw hidden under another screw on earlier Feds, or the camera top is removed and the stop of the arm is adjusted. Usually there is a set screw bearing on the arm rest, and turning this will adjust the image, which is made by a pivoting half silvered mirror, or a pivoting split prism block.
The tip of the rangefinder arm can also be adjusted, but only do this as last resort, it will sometimes be a riveted joint, not a screwed one.
So make the basic check that 28.80 is all right, then adjust the arm to get coincidence of the image at infinity, (+1000 metres), but also check at about 4 metres as well, a double check. Most domestic tapes will measure 3/4 metres accurately.
This all ensures the lens focuses well enough at normal apertures, as DOF covers any errors. But DOF will not cover up basic 28.80 errors at large apertures, the adjusted rangefinder will indicate it is OK, but the lens will still be out.
Stephen.
|
|
lloydy
Lifetime Member
Posts: 506
|
Post by lloydy on Dec 3, 2012 18:33:46 GMT -5
cccp.alien-planet.net/maizenberg-cameras1.pdfI stumbled across this tonight, and it looks very helpful. Not being critical of Stephen's expertise, but I don't like to use a vernier caliper for measuring the register distance, there's too much chance of error if the vernier is not kept perfectly square to the lens mount. Having been a hands on engineer all my working life, many years in quality control, and using verniers and measuring tools almost daily I only use the depth gauge part for measuring a step where the 'tail' can be rested against one surface. The end face of the vernier is too small to keep square without some support and very little inclination can introduce an error. I tried to set my Zorki with an expensive digital Mitutoyu vernier and failed dismally, even with the camera held solidly on a tripod head / clamp leaving my hands free. As I went around the lens mount flange and noted the readings I kept getting different readings from the same position. Then I got off my butt and went and got a proper depth micrometer from my workshop and I found that my efforts with the vernier were nearly 0.15mm different on four points around the lens flange. The depth micrometer has a larger base and sits squarely, and the friction thimble ensures greater consistency. But it was definitely a job worth doing, and simple enough get correct with paper shims.
|
|
Deleted
Deleted Member
Posts: 0
|
Post by Deleted on Dec 3, 2012 18:46:16 GMT -5
Here's my FSU camera Lens to film checker. The flat aluminum bar lays across the lens mount and the brass rod is exactly 28.80 long. I can move it around and check the distance on all point on the film plane and add or subtrack shimes until it is correct.  |
|
lloydy
Lifetime Member
Posts: 506
|
Post by lloydy on Dec 3, 2012 19:00:02 GMT -5
That's a great, and cheap, alternative Wayne. The flat bar is big enough to span the lens mount and keep it all square.
|
|
Stephen
Lifetime Member
Still collecting.......
Posts: 2,718
|
Post by Stephen on Dec 4, 2012 7:25:14 GMT -5
cccp.alien-planet.net/maizenberg-cameras1.pdfI stumbled across this tonight, and it looks very helpful. Not being critical of Stephen's expertise, but I don't like to use a vernier caliper for measuring the register distance, there's too much chance of error if the vernier is not kept perfectly square to the lens mount. Having been a hands on engineer all my working life, many years in quality control, and using verniers and measuring tools almost daily I only use the depth gauge part for measuring a step where the 'tail' can be rested against one surface. The end face of the vernier is too small to keep square without some support and very little inclination can introduce an error. I tried to set my Zorki with an expensive digital Mitutoyu vernier and failed dismally, even with the camera held solidly on a tripod head / clamp leaving my hands free. As I went around the lens mount flange and noted the readings I kept getting different readings from the same position. Then I got off my butt and went and got a proper depth micrometer from my workshop and I found that my efforts with the vernier were nearly 0.15mm different on four points around the lens flange. The depth micrometer has a larger base and sits squarely, and the friction thimble ensures greater consistency. But it was definitely a job worth doing, and simple enough get correct with paper shims. I mentioned the Vernier Calliper mainly as a cheaper alternative to the depth micrometer, and as you say it is more difficult to measure without extra care, but there is a trick, just use a flat bar of metal across the lens flange, (any practical thickness), and simply subtract it's measured thickness from the result, which should be 28.80. This provides a centralised bar to rest the heel of the vernier on. (Even a piece of flat hardwood would suffice at a pinch). Or if it is a Digital Vernier calliper, they can be zeroed when resting against the bar and will directly indicate the depth, as it is zeroed at the bar thickness, which you don't even have to measure!!! I have just tried this method on the Perifex and it indicates......28.80, thank goodness! But the Fed body is indicating 28.78....needs adjusting with cigarette paper shims!!. Both figures exactly agree with my Starrett depth micrometer, tested with slip gauges, so the Digital Vernier does work in this situation. Stephen. |
|
Stephen
Lifetime Member
Still collecting.......
Posts: 2,718
|
Post by Stephen on Dec 4, 2012 7:30:23 GMT -5
One basic point I failed to emphasise is the lens film to flange distance must be correct, full stop!... Once set correctly, the lens focusing scale will always work, and it can be focused with another rangefinder, guess work, or DOF or Zone focus, the camera rangefinder merely goes along for the ride!...nice to have accurate, but in fact not vital!
Stephen.
|
|
Deleted
Deleted Member
Posts: 0
|
Post by Deleted on Dec 4, 2012 9:58:27 GMT -5
That's a great, and cheap, alternative Wayne. The flat bar is big enough to span the lens mount and keep it all square. The bar is actually long enough so the measuring probe can be moved to any point on the film plane without the bar falling off the mount. I used brass for the probe and rounded and smoothed the tip to reduce the chances of scratching the pressure plate. |
|


