
Post by PeterW on Nov 26, 2005 18:46:45 GMT -5
Hi all,
Someone, I think it was Curt, asked if I'd post my notes and pictures on getting a smoother shutter release on a Zenit. OK, here they are. A bit long, but never mind.
Quite a few Zenits EMs have shutter releases that are either heavy or jerky or both. They’re nothing like as smooth as most releases on the Zenit B and E. The EM has an automatic aperture stop-down whereas the B and E don’t, so it follows that the heavy or jerky release is something to do with the auto aperture mechanism. Moreover, not all models with auto aperture mechanism have heavy or jerky shutter releases, so it also follows that there must be an adjustment somewhere.
When I started investigating my own Zenits, I found in a few cases that, in its fully forward position, the auto aperture plate was fouling the body before the shutter fired. Further pressure on the release tried to move the plate even further forward, but instead bent one of the arms on which the plate pivots.
I took the top plate off an old parts EM which had a very heavy release to investigate, and the reason soon became obvious. There is provision for adjustment, but it was way out of adjustment. It isn’t a difficult adjustment to make, but you have to take off the camera top plate and the pentaprism to get at the adjustment screws. It might just be possible to do it without taking off the pentaprism, and I suspect someone had tried on this EM, but I don’t think they succeeded. All they did was slightly mangle the slot in the lower screw, the most difficult one to get at. It was still very tight when I loosened it. And they obviously hadn’t managed to make any adjustment because it was way out. In any case, taking the pentaprism off is no trouble, and it gives you a chance to clean the dust off the top of the screen and renew the foam pad over the pentaprism which will probably be sticky and horrible.
Before going on to making the adjustment I’ll run through the action of the auto aperture mechanism. When you get the top plate off you’ll see that the release button in the top plate pushes down on a lever. This lever runs forward and is an extension of a rocking bar. Also attached to the rocking bar is a small roller. This roller engages with a triangular shaped cam plate which is held to one of the arms of the aperture plate by two screws. The cam plate has slotted holes to allow it to be adjusted.
When the mechanism is at rest, the roller is below the apex of the cam, either just touching the lower sloping face or very close to it. If you press down on the release lever you’ll see that the roller rides up the lower face of the cam, pushing it back so that the aperture plate inside the lens housing moves forward. If the adjustment is correct, then with the aperture plate fully forward, almost but not quite touching the camera body, the roller should be sitting right on the apex of the triangular cam. As you press further down on the release lever to fire the shutter the roller runs along the upper face of the cam without moving the cam back any further.
If the aperture plate moves fully forward to the point where it is touching the camera body before the roller reaches the apex of the cam, things come to a stop. You have to press hard on the lever (or the release button) to move the roller up to the cam apex. This pushes the cam back but, as the plate can’t move any further forward, the arm which carries the cam, or the arm on the opposite side, has to bend and you get a hard, jerky release instead of a smooth progressive one. I took some pictures of the EM’s auto aperture mechanism after I’d adjusted it.
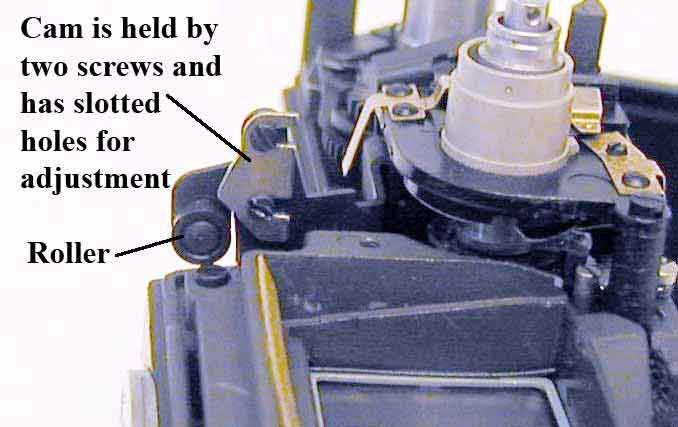
A view inside the EM with the pentaprism taken off showing the triangular cam and the roller that pushes it back when you press down on the release lever. The mechanism is at rest, and the roller is below the apex of the cam almost but not quite touching the lower face. At this stage the aperture plate inside the lens housing is fully back.

This shows the position as it should be after you take the ‘first pressure’ on the release to bring the aperture plate forward and stop down the lens diaphragm. The roller is right on the apex of the triangular cam. It must not be below the apex at this stage.
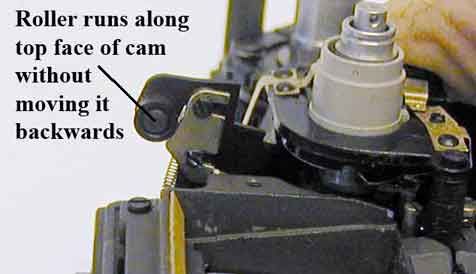
When you push further down on the release to fire the shutter the roller rides up the top face of the cam. The geometry is arranged so that the roller does not try to push the cam back any further, so you don’t get a hard spot.
OK, now you know what ought to happen, I’ll go through the method I used for adjusting things so it does. I haven’t got Maizenberg’s book on repairing Russian cameras, so I don’t know whether or not he uses the same method. I worked on a trial and error basis to find the method I found easiest.
First, I moved the auto aperture plate fully forward to see whether or not it could foul the body at its fully forward position. On this particular EM I found that the right hand arm of the aperture plate, looking inside the lens housing, definitely fouled hard on the body. This is what was happening when I took the ‘first pressure’ on the release.
I put a piece of card about 1/32in (0.80mm) thick between the plate arm and the body where it was fouling. Then I pushed down on the shutter release lever and watched the roller as it moved up the lower cam face. It stopped below the apex of the cam. Then I loosened the two screws holding the cam and adjusted it so that the roller was just on the apex before tightening the screws again It took a little bit of fiddling and trial to get it right, but it wasn’t difficult. Then I took the piece of card out and tried the release again.
This time, when I took the ‘first pressure’, the roller stopped on the apex of the cam and the aperture plate was still clear of the body. With further, quite gentle, pressure on the release lever the roller rode along the top face of the cam without having to force its way over the apex, and the shutter fired without the cam moving any further backwards.
NOTE!
Since I first wrote the above I’ve discovered that KMZ specifies a forward position for the aperture plate. It is 6.1mm +0.02mm -0.03mm behind the front face of the lens mounting ring. In other words, when the roller is on the apex of the cam the
aperture plate should be between 6.07mm and 6.12mm behind the lens mounting ring face.
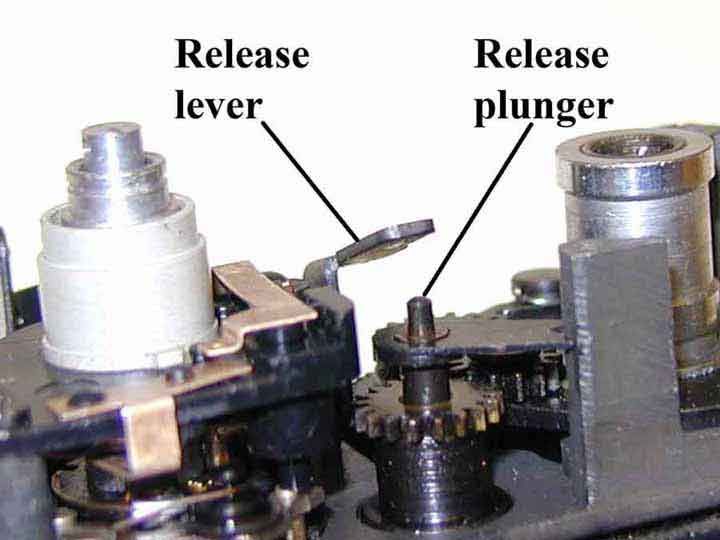
This view from the back of the camera shows the position of the release lever as it originally was on the EM with the shutter release at rest. When I pushed down on the lever to take the first pressure it stopped with still quite a gap, nearly 1/8in (3mm) between the lever and the top of the release plunger which fires the shutter.
This gap didn’t affect the smoothness of the shutter but it meant that there was some free play in the release after taking the first pressure to close the lens diaphragm and the second pressure to fire the shutter, and I didn’t care for the feel of it. The only way I could see to get rid of this large gap was to bend the release lever down slightly. Actually it was more a case of straightening it slightly as the lever already had a bend in it. I did this by trial and error till I was happy with the feel of the release sequence, and left a very small gap, only about 0.015in (about 0.38mm) between the lever and the plunger after taking the first pressure.
That deals with the last part of CLA, the adjust part, now to the lubrication, which gets the action really smooth. Where I used oil I used just the smallest amount. It needs to lubricate only the parts that touch when they move, not the whole surrounding area. Most people use far too much oil in the belief that they are erring on the ‘safe’ side. All they’re doing is making a magnet for dust which turns the oil into a sort of grinding paste.
What I do is to use an upturned watch glass, actually a plastic UB, or Unbreakable, as watch repairers call it. In this I put a drop of oil carried over from the oil bottle on the largest of my instrument screwdrivers. Then I take the smallest of my screwdrivers, dip the end in this drop of oil and touch it against the part I want to lubricate. It carries quite enough oil to do the job. I used to use watchmaker’s oil till my local watch repairer closed, but now I use a silicone oil from Tandy which I find does the job very well. It says on the bottle that it’s guaranteed not to thicken or dry out for 10 years, which is good enough for me. For grease where needed I use a high melting point white grease from my local auto suppliers, actually Castrol PH, but I’m sure there are other makes which are similar.
I lubricated the parts as follows: oil on the spindle of the roller, on the release plunger, the sleeve surrounding the release plunger and where the rod that is part of the shutter release mechanism goes down through the top of the camera body. I also put a very small amount of oil on the pivots of the aperture plate even though the plate swung without any stiffness. I also put the tiniest smear of grease on the faces of the cam even though the roller rolls and doesn’t slide. Also, the sleeve round the release plunger has a forked extension which runs up and down one of the pillars of the body. It stops the sleeve turning when you set it to rewind. It’s a very loose fit, but on the basis that if anything rubs there’s friction I greased it lightly. On the top of the release lever you can see marks where the shutter release button slides along it. I put just a smear of grease on the top face of the lever. I also lightly oiled the release button in the top plate.
On a 12XP which I also adjusted I found the aperture plate itself was fouling on the body at the front.
I haven’t come across the following on the cameras I have adjusted so far, but I can see that they might also be possible reasons for a heavy shutter release:
1. Sticking roller on the release rocking plate so it slides instead of rolling.
2. Stiffness at the pivots of the aperture plate.
3. Sticking shutter release plunger (would possibly also cause other problems like the shutter releasing itself as soon as it was cocked).
4. Sticking or binding at the pillars where the release mechanism passes down through the top of the body (would need further dismantling to investigate).
5. Sticking release button in the camera’s top plate
I hope this has been helpful to you in finding and curing the cause of a heavy or jerky shutter release on your auto-aperture Zenits. Good luck!
Peter
Text and pictures Copyright © 2004 Peter Wallage.
If you want to print these out for your own use, go ahead. If you want to use them on a website or in any other way, please get in touch with me first. My e-mail address is on my profile.
Someone, I think it was Curt, asked if I'd post my notes and pictures on getting a smoother shutter release on a Zenit. OK, here they are. A bit long, but never mind.
Quite a few Zenits EMs have shutter releases that are either heavy or jerky or both. They’re nothing like as smooth as most releases on the Zenit B and E. The EM has an automatic aperture stop-down whereas the B and E don’t, so it follows that the heavy or jerky release is something to do with the auto aperture mechanism. Moreover, not all models with auto aperture mechanism have heavy or jerky shutter releases, so it also follows that there must be an adjustment somewhere.
When I started investigating my own Zenits, I found in a few cases that, in its fully forward position, the auto aperture plate was fouling the body before the shutter fired. Further pressure on the release tried to move the plate even further forward, but instead bent one of the arms on which the plate pivots.
I took the top plate off an old parts EM which had a very heavy release to investigate, and the reason soon became obvious. There is provision for adjustment, but it was way out of adjustment. It isn’t a difficult adjustment to make, but you have to take off the camera top plate and the pentaprism to get at the adjustment screws. It might just be possible to do it without taking off the pentaprism, and I suspect someone had tried on this EM, but I don’t think they succeeded. All they did was slightly mangle the slot in the lower screw, the most difficult one to get at. It was still very tight when I loosened it. And they obviously hadn’t managed to make any adjustment because it was way out. In any case, taking the pentaprism off is no trouble, and it gives you a chance to clean the dust off the top of the screen and renew the foam pad over the pentaprism which will probably be sticky and horrible.
Before going on to making the adjustment I’ll run through the action of the auto aperture mechanism. When you get the top plate off you’ll see that the release button in the top plate pushes down on a lever. This lever runs forward and is an extension of a rocking bar. Also attached to the rocking bar is a small roller. This roller engages with a triangular shaped cam plate which is held to one of the arms of the aperture plate by two screws. The cam plate has slotted holes to allow it to be adjusted.
When the mechanism is at rest, the roller is below the apex of the cam, either just touching the lower sloping face or very close to it. If you press down on the release lever you’ll see that the roller rides up the lower face of the cam, pushing it back so that the aperture plate inside the lens housing moves forward. If the adjustment is correct, then with the aperture plate fully forward, almost but not quite touching the camera body, the roller should be sitting right on the apex of the triangular cam. As you press further down on the release lever to fire the shutter the roller runs along the upper face of the cam without moving the cam back any further.
If the aperture plate moves fully forward to the point where it is touching the camera body before the roller reaches the apex of the cam, things come to a stop. You have to press hard on the lever (or the release button) to move the roller up to the cam apex. This pushes the cam back but, as the plate can’t move any further forward, the arm which carries the cam, or the arm on the opposite side, has to bend and you get a hard, jerky release instead of a smooth progressive one. I took some pictures of the EM’s auto aperture mechanism after I’d adjusted it.
A view inside the EM with the pentaprism taken off showing the triangular cam and the roller that pushes it back when you press down on the release lever. The mechanism is at rest, and the roller is below the apex of the cam almost but not quite touching the lower face. At this stage the aperture plate inside the lens housing is fully back.
This shows the position as it should be after you take the ‘first pressure’ on the release to bring the aperture plate forward and stop down the lens diaphragm. The roller is right on the apex of the triangular cam. It must not be below the apex at this stage.
When you push further down on the release to fire the shutter the roller rides up the top face of the cam. The geometry is arranged so that the roller does not try to push the cam back any further, so you don’t get a hard spot.
OK, now you know what ought to happen, I’ll go through the method I used for adjusting things so it does. I haven’t got Maizenberg’s book on repairing Russian cameras, so I don’t know whether or not he uses the same method. I worked on a trial and error basis to find the method I found easiest.
First, I moved the auto aperture plate fully forward to see whether or not it could foul the body at its fully forward position. On this particular EM I found that the right hand arm of the aperture plate, looking inside the lens housing, definitely fouled hard on the body. This is what was happening when I took the ‘first pressure’ on the release.
I put a piece of card about 1/32in (0.80mm) thick between the plate arm and the body where it was fouling. Then I pushed down on the shutter release lever and watched the roller as it moved up the lower cam face. It stopped below the apex of the cam. Then I loosened the two screws holding the cam and adjusted it so that the roller was just on the apex before tightening the screws again It took a little bit of fiddling and trial to get it right, but it wasn’t difficult. Then I took the piece of card out and tried the release again.
This time, when I took the ‘first pressure’, the roller stopped on the apex of the cam and the aperture plate was still clear of the body. With further, quite gentle, pressure on the release lever the roller rode along the top face of the cam without having to force its way over the apex, and the shutter fired without the cam moving any further backwards.
NOTE!
Since I first wrote the above I’ve discovered that KMZ specifies a forward position for the aperture plate. It is 6.1mm +0.02mm -0.03mm behind the front face of the lens mounting ring. In other words, when the roller is on the apex of the cam the
aperture plate should be between 6.07mm and 6.12mm behind the lens mounting ring face.
This view from the back of the camera shows the position of the release lever as it originally was on the EM with the shutter release at rest. When I pushed down on the lever to take the first pressure it stopped with still quite a gap, nearly 1/8in (3mm) between the lever and the top of the release plunger which fires the shutter.
This gap didn’t affect the smoothness of the shutter but it meant that there was some free play in the release after taking the first pressure to close the lens diaphragm and the second pressure to fire the shutter, and I didn’t care for the feel of it. The only way I could see to get rid of this large gap was to bend the release lever down slightly. Actually it was more a case of straightening it slightly as the lever already had a bend in it. I did this by trial and error till I was happy with the feel of the release sequence, and left a very small gap, only about 0.015in (about 0.38mm) between the lever and the plunger after taking the first pressure.
That deals with the last part of CLA, the adjust part, now to the lubrication, which gets the action really smooth. Where I used oil I used just the smallest amount. It needs to lubricate only the parts that touch when they move, not the whole surrounding area. Most people use far too much oil in the belief that they are erring on the ‘safe’ side. All they’re doing is making a magnet for dust which turns the oil into a sort of grinding paste.
What I do is to use an upturned watch glass, actually a plastic UB, or Unbreakable, as watch repairers call it. In this I put a drop of oil carried over from the oil bottle on the largest of my instrument screwdrivers. Then I take the smallest of my screwdrivers, dip the end in this drop of oil and touch it against the part I want to lubricate. It carries quite enough oil to do the job. I used to use watchmaker’s oil till my local watch repairer closed, but now I use a silicone oil from Tandy which I find does the job very well. It says on the bottle that it’s guaranteed not to thicken or dry out for 10 years, which is good enough for me. For grease where needed I use a high melting point white grease from my local auto suppliers, actually Castrol PH, but I’m sure there are other makes which are similar.
I lubricated the parts as follows: oil on the spindle of the roller, on the release plunger, the sleeve surrounding the release plunger and where the rod that is part of the shutter release mechanism goes down through the top of the camera body. I also put a very small amount of oil on the pivots of the aperture plate even though the plate swung without any stiffness. I also put the tiniest smear of grease on the faces of the cam even though the roller rolls and doesn’t slide. Also, the sleeve round the release plunger has a forked extension which runs up and down one of the pillars of the body. It stops the sleeve turning when you set it to rewind. It’s a very loose fit, but on the basis that if anything rubs there’s friction I greased it lightly. On the top of the release lever you can see marks where the shutter release button slides along it. I put just a smear of grease on the top face of the lever. I also lightly oiled the release button in the top plate.
On a 12XP which I also adjusted I found the aperture plate itself was fouling on the body at the front.
I haven’t come across the following on the cameras I have adjusted so far, but I can see that they might also be possible reasons for a heavy shutter release:
1. Sticking roller on the release rocking plate so it slides instead of rolling.
2. Stiffness at the pivots of the aperture plate.
3. Sticking shutter release plunger (would possibly also cause other problems like the shutter releasing itself as soon as it was cocked).
4. Sticking or binding at the pillars where the release mechanism passes down through the top of the body (would need further dismantling to investigate).
5. Sticking release button in the camera’s top plate
I hope this has been helpful to you in finding and curing the cause of a heavy or jerky shutter release on your auto-aperture Zenits. Good luck!
Peter
Text and pictures Copyright © 2004 Peter Wallage.
If you want to print these out for your own use, go ahead. If you want to use them on a website or in any other way, please get in touch with me first. My e-mail address is on my profile.