


Post by PeterW on Feb 20, 2006 9:07:23 GMT -5
Hi all,
Quite a few people seem to have problems loading film into a bottom loading Leica or Zorki. For example, in a recent thread Ron Head wrote
Don't know about on the run, Ron, but don't give up on your Leica, it's a lovely camera to use. I like to have the camera upside down on something firm while I'm loading, but I've had pre-war bottom loading Leicas for years, and never had any problems once I was shown how to do it.
In the days when I used my Leica II a lot, and my Zorki C, I used to buy b&w film in bulk and reload old cassettes, so I had to trim the end of the film, and still do when I want to use them. I've never had a Leitz cutting template, I've always cut by eye with a pair of scissors. Here's the drill:
Pull about 4 inches or so out of the cassette and have it with the emulsion facing you. Start the cut between the 23rd and 24th perforation hole counting from the end along the bottom. Make sure you don't cut through a perforation. Start with a curve that takes you up towards the approximate middle of the film (it's not all that critical), curve the cut again towards the end and cut right along to the end. It's a bit fiddling till you get used to it because the film tends to curl itself up round the scissors, but it's not a precision job. The diagram in Leitz literature shows a nice curve upwards at the end of the film, but I just leave the end square. Doesn't seem to make any difference.
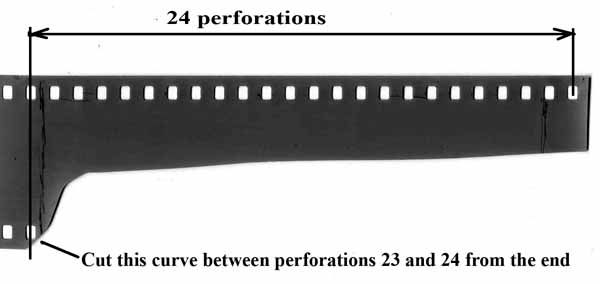
Here's a scan of the end of a film I just cut.
OK, Now have the camera upside down on a table with the lens away from you and the baseplate off. Check that the clutch is NOT on rewind. Wind the film back into the cassette until NO MORE THAN TWO COMPLETE PERFORATIONS ON EACH SIDE ARE SHOWING. THIS IS IMPORTANT.
Clip the end of the film under the spring on the take-up spool making sure it's snug against the end flange and sitting squarely. Remember that the film winds on 'inside out' with the the emulsion on the OUTSIDE.
Check again about the two perforations showing from the cassette, and drop the cassette and spool into the camera feeding the film down the slot into the film plane. When both cassette and spool are seated, tension the film slightly with the wind on knob and replace the baseplate. Fire off two 'blank' exposures.
Now, with the camera the right way up, turn the exposure counter to Number 0, tension the film inside the casette by turning the rewind knob. Wind on and fire off one more blank exposure to bring the counter to Number 1. While you're winding on check that the rewind knob is turning.
And that's it. You're ready to start shooting. Keep an eye on the rewind knob from time to time to make sure it's turning. It sounds a complicated routine compared with today's auto load, but once you've done it a few times with a 'dud' film it's really very easy.
Good luck!
Peter
Quite a few people seem to have problems loading film into a bottom loading Leica or Zorki. For example, in a recent thread Ron Head wrote
My old Leica IIIc does work, but I have only ever used it once. Yes...loading "scared" me off.
But I have read stories of photographers during the earlier wars who used Leica RF's and were so adept at it that they could change film on the run.
But I have read stories of photographers during the earlier wars who used Leica RF's and were so adept at it that they could change film on the run.
Don't know about on the run, Ron, but don't give up on your Leica, it's a lovely camera to use. I like to have the camera upside down on something firm while I'm loading, but I've had pre-war bottom loading Leicas for years, and never had any problems once I was shown how to do it.
In the days when I used my Leica II a lot, and my Zorki C, I used to buy b&w film in bulk and reload old cassettes, so I had to trim the end of the film, and still do when I want to use them. I've never had a Leitz cutting template, I've always cut by eye with a pair of scissors. Here's the drill:
Pull about 4 inches or so out of the cassette and have it with the emulsion facing you. Start the cut between the 23rd and 24th perforation hole counting from the end along the bottom. Make sure you don't cut through a perforation. Start with a curve that takes you up towards the approximate middle of the film (it's not all that critical), curve the cut again towards the end and cut right along to the end. It's a bit fiddling till you get used to it because the film tends to curl itself up round the scissors, but it's not a precision job. The diagram in Leitz literature shows a nice curve upwards at the end of the film, but I just leave the end square. Doesn't seem to make any difference.
Here's a scan of the end of a film I just cut.
OK, Now have the camera upside down on a table with the lens away from you and the baseplate off. Check that the clutch is NOT on rewind. Wind the film back into the cassette until NO MORE THAN TWO COMPLETE PERFORATIONS ON EACH SIDE ARE SHOWING. THIS IS IMPORTANT.
Clip the end of the film under the spring on the take-up spool making sure it's snug against the end flange and sitting squarely. Remember that the film winds on 'inside out' with the the emulsion on the OUTSIDE.
Check again about the two perforations showing from the cassette, and drop the cassette and spool into the camera feeding the film down the slot into the film plane. When both cassette and spool are seated, tension the film slightly with the wind on knob and replace the baseplate. Fire off two 'blank' exposures.
Now, with the camera the right way up, turn the exposure counter to Number 0, tension the film inside the casette by turning the rewind knob. Wind on and fire off one more blank exposure to bring the counter to Number 1. While you're winding on check that the rewind knob is turning.
And that's it. You're ready to start shooting. Keep an eye on the rewind knob from time to time to make sure it's turning. It sounds a complicated routine compared with today's auto load, but once you've done it a few times with a 'dud' film it's really very easy.
Good luck!
Peter

