Post by SidW on Oct 21, 2008 18:19:15 GMT -5
I'm posting this thread here as it's largely about filtering, albeit during processing rather than during the original exposure of the film.
The colour of my Ektachrome transparencies taken in 1961 has shifted to magenta, with general desaturation. This happened within 20 years from exposure and processing. Some trasparencies also have orange spots that grow larger over time. The film was 35mm high speed daylight 160 ASA introduced in 1959, process E2.
(1) The transparencies were scanned at 4000 d.p.i. with no other adjustments than stretching levels over the full lightness range from 0 to 255 without any clipping. Then (2), after any cropping, levels were adjusted (neutral midtones snapped, highlights and deepest shadows balanced to white and black, carefull clipping of highlights to preserve highlight detail, midtones lightened or darkened as necessary). Then (3) colour balancing; the magenta cast means green needs augmenting, sometimes by as much as 70%; red and blue usually need adjusting as well; highlights and deepest shadows are then brought back to white and black again. Finally (4) Saturation adjustment and retouching; each colour is adjusted individually - magentas, blues, cyans, greens, yellows and reds; this is a treacherous step as perception alters while you're working so it's very easy to oversaturate, resulting in horribly gaudy pictures.
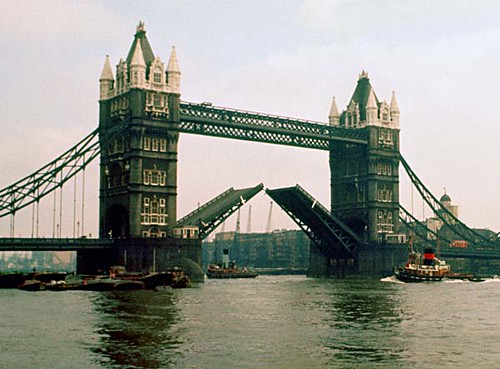
First example: Tower Bridge (London)
A. Step 1. As scanned, slightly dark, a massive magenta cast and a seemingly
monochrome image apart from the funnels of the tugs and a hint of a blue sky:

A. Step 2. Cropped. The levels adjustments have partly corrected the magenta cast,
and more red and blue details have appeared. Lightened.

A. Step 3. Colour balancing of red -60%, green +20%, blue -10%; the magenta
cast has gone, the colours are more natural, but there's still a hint of red or
magenta in the clouds. The camera was facing southeast, light is from the
southwest so this was taken in the evening when there might have been a
slight red glow in the sky.

A. Step 4. The final version after adjusting saturation (Magentas -90%, Blues +50%,
Cyans +20%, Greens +40%, Yellows +20%, Reds +30%) and retouching
(mainly scratch marks in the sky area).
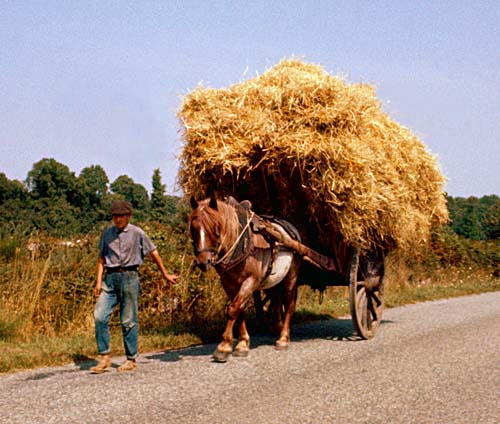
Second example: Hay wain (Bretagne)
B. Step 1. As scanned. a magenta cast with some colour showing through,
also severe orange spotting.

B. Step 2. Cropped. The levels adjustments have partly corrected the magenta cast,
and red blue and brown detail is more distinct. Lightened.

B. Step 3. Colour balancing of red -20%, green +40%, blue +10%. This has corrected
the magenta cast, the colours are more natural but somewhat dull.

B. Step 4. The final version after adjusting saturation (Magentas -90%, Blues +40%,
Cyans +50%, Greens +70%, Yellows +20%, Reds +20%) and retouching
(mainly scratch marks in the sky area and the orange spots).
The colour of my Ektachrome transparencies taken in 1961 has shifted to magenta, with general desaturation. This happened within 20 years from exposure and processing. Some trasparencies also have orange spots that grow larger over time. The film was 35mm high speed daylight 160 ASA introduced in 1959, process E2.
(1) The transparencies were scanned at 4000 d.p.i. with no other adjustments than stretching levels over the full lightness range from 0 to 255 without any clipping. Then (2), after any cropping, levels were adjusted (neutral midtones snapped, highlights and deepest shadows balanced to white and black, carefull clipping of highlights to preserve highlight detail, midtones lightened or darkened as necessary). Then (3) colour balancing; the magenta cast means green needs augmenting, sometimes by as much as 70%; red and blue usually need adjusting as well; highlights and deepest shadows are then brought back to white and black again. Finally (4) Saturation adjustment and retouching; each colour is adjusted individually - magentas, blues, cyans, greens, yellows and reds; this is a treacherous step as perception alters while you're working so it's very easy to oversaturate, resulting in horribly gaudy pictures.
First example: Tower Bridge (London)
A. Step 1. As scanned, slightly dark, a massive magenta cast and a seemingly
monochrome image apart from the funnels of the tugs and a hint of a blue sky:
A. Step 2. Cropped. The levels adjustments have partly corrected the magenta cast,
and more red and blue details have appeared. Lightened.
A. Step 3. Colour balancing of red -60%, green +20%, blue -10%; the magenta
cast has gone, the colours are more natural, but there's still a hint of red or
magenta in the clouds. The camera was facing southeast, light is from the
southwest so this was taken in the evening when there might have been a
slight red glow in the sky.
A. Step 4. The final version after adjusting saturation (Magentas -90%, Blues +50%,
Cyans +20%, Greens +40%, Yellows +20%, Reds +30%) and retouching
(mainly scratch marks in the sky area).
Second example: Hay wain (Bretagne)
B. Step 1. As scanned. a magenta cast with some colour showing through,
also severe orange spotting.
B. Step 2. Cropped. The levels adjustments have partly corrected the magenta cast,
and red blue and brown detail is more distinct. Lightened.
B. Step 3. Colour balancing of red -20%, green +40%, blue +10%. This has corrected
the magenta cast, the colours are more natural but somewhat dull.
B. Step 4. The final version after adjusting saturation (Magentas -90%, Blues +40%,
Cyans +50%, Greens +70%, Yellows +20%, Reds +20%) and retouching
(mainly scratch marks in the sky area and the orange spots).