Post by PeterW on Feb 12, 2011 11:54:33 GMT -5
Hi all,
The subject of posting pictures on this forum crops up time and time again, and it seems that different members have different methods. I’ve used Photobucket ever since I joined the forum in 2005 and find that, for me, it’s the easiest way.
We don’t seem to have a standard page to answer the question so I decided to write one. Please note that I use Windows. The method may be slightly different with a Mac.
Could one or two knowledgable members run through each step, please, because I’m human and as open to error as the next guy.
It sounds long-winded but it is really quite fast once you get used to it.
Here goes:
There are two preliminaries before we start loading a picture. The first is fairly obvious: go to Photobucket and get yourself an album.
The second isn’t so obvious. Always size your picture BEFORE you upload it to your album Photobucket may make an attempt to size down a picture that is too big, but in my opinion doesn’t do a very good job.
The maximum width we can use on the forum is 800 pixels but I usually make my pics a bit less wide, particularly if any are portrait format. First do a “save as “ of your picture and use whatever image editor you ‘ve got to make the picture 72pixels/inch resolution. No point in going higher because 72ppi is the highest a computer screen will resolve. Then set the width – I usually go for about 700 to 750 pixels.
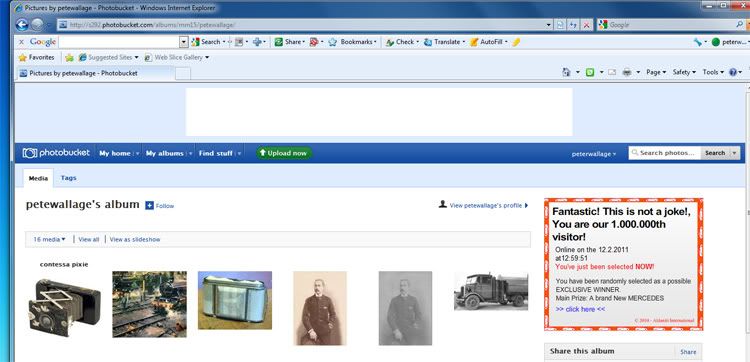
OK, prelims over. Now we can upload our picture(s) into our Photobucket album.Open your album and you’ll get something like Screenshot 1 except that you won't yet have any pictures in it.
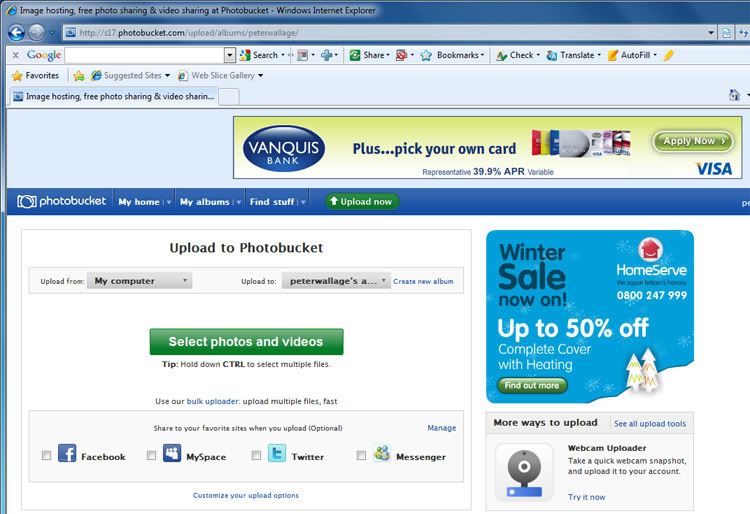
Click in the green box that says “upload now”. This will give you Screenshot 2
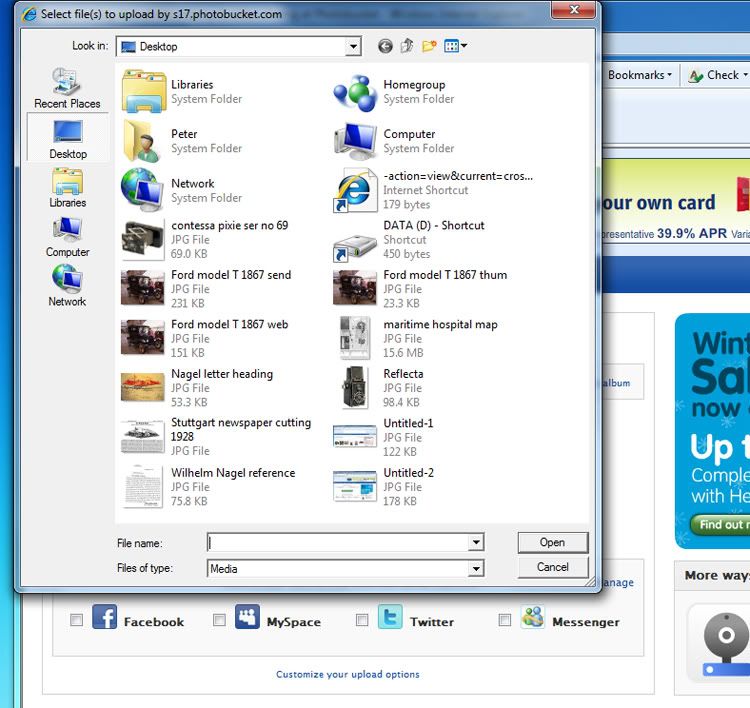
Click on “Select Photos and Videos” and you get Screenshot 3
Choose your picture and click “Open” (almost there now) You’ll get Screenshot 4
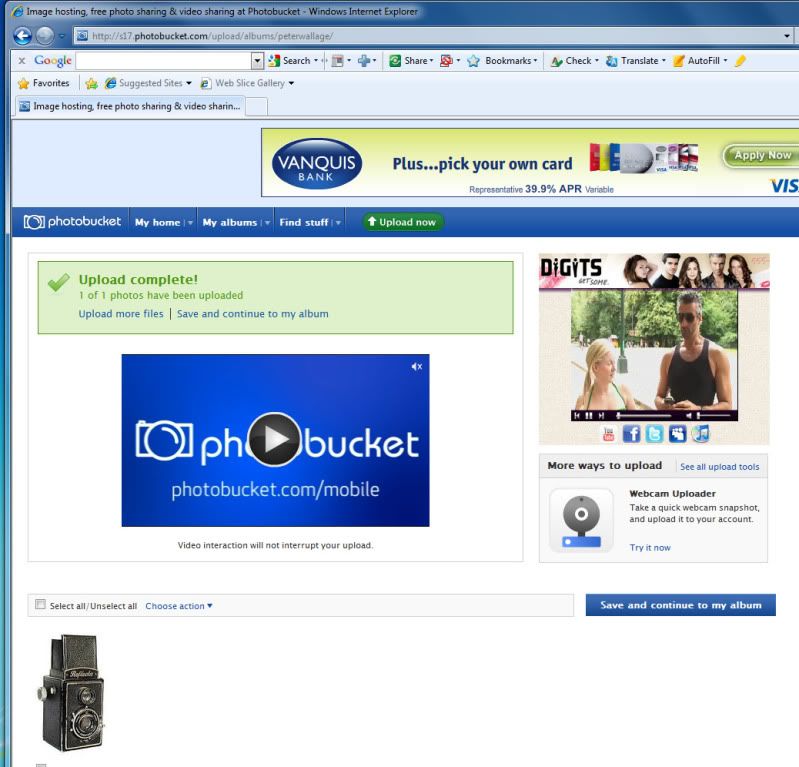
Hover the mouse pointer over your picture, and underneath it you’ll get some words and a box marked IMG. Click in this box, and it will say “copied” which means you’ve now got that IMG code on your clipboard.
]Click in “Save to my album” and you’ll get Screenshot 5 with your picture safely inside the album.

Paste the IMG code in the reply box on the forum and click on Preview. Your picture should be in there.
TIP! If you are posting several pictures, save their imdividual IMG codes into a word processor that you can run alonside Photobucket. Then you don't have to keep chopping and changing between your forum posting and Photobucket.
PeterW
The subject of posting pictures on this forum crops up time and time again, and it seems that different members have different methods. I’ve used Photobucket ever since I joined the forum in 2005 and find that, for me, it’s the easiest way.
We don’t seem to have a standard page to answer the question so I decided to write one. Please note that I use Windows. The method may be slightly different with a Mac.
Could one or two knowledgable members run through each step, please, because I’m human and as open to error as the next guy.
It sounds long-winded but it is really quite fast once you get used to it.
Here goes:
There are two preliminaries before we start loading a picture. The first is fairly obvious: go to Photobucket and get yourself an album.
The second isn’t so obvious. Always size your picture BEFORE you upload it to your album Photobucket may make an attempt to size down a picture that is too big, but in my opinion doesn’t do a very good job.
The maximum width we can use on the forum is 800 pixels but I usually make my pics a bit less wide, particularly if any are portrait format. First do a “save as “ of your picture and use whatever image editor you ‘ve got to make the picture 72pixels/inch resolution. No point in going higher because 72ppi is the highest a computer screen will resolve. Then set the width – I usually go for about 700 to 750 pixels.
OK, prelims over. Now we can upload our picture(s) into our Photobucket album.Open your album and you’ll get something like Screenshot 1 except that you won't yet have any pictures in it.

Click in the green box that says “upload now”. This will give you Screenshot 2

Click on “Select Photos and Videos” and you get Screenshot 3

Choose your picture and click “Open” (almost there now) You’ll get Screenshot 4

Hover the mouse pointer over your picture, and underneath it you’ll get some words and a box marked IMG. Click in this box, and it will say “copied” which means you’ve now got that IMG code on your clipboard.
]Click in “Save to my album” and you’ll get Screenshot 5 with your picture safely inside the album.

Paste the IMG code in the reply box on the forum and click on Preview. Your picture should be in there.
TIP! If you are posting several pictures, save their imdividual IMG codes into a word processor that you can run alonside Photobucket. Then you don't have to keep chopping and changing between your forum posting and Photobucket.
PeterW
